Pages

Monday, 5 August 2013

Lawtons Drugstore Haul


Another haul from Lawtons Drugs! I decided to splurge a little and get a few new makeup products. I was a little disappointed by the lack of sales at Lawtons today, so my total was $74.12 for 7 products.

1. Revlon Just Bitten Kissable balm stain in Honey. $9.95. The colour is darker than I expected, and a little more purple-y, but the colour still looks nice and I've heard that these feel great on the lips!

2. CoverGirl Lip Perfection jumbo gloss blam in Blush Twist. $7.19. Has a bit of shimmer, and the colour is exactly the same as the cap, so there's no mistaking the colour! I've heard so many good things about these pencil-style balms that I had to get a few of my own.

3. Milani eyeshadow primer in Nude. $9.99. This is my first eyeshadow primer, and I'm not entirely sure why I haven't bought one in the past! It says it works on all skin tones, so that sounds pretty good to me.

4. CoverGirl + Olay concealer balm in Fair. $7.99. I really like my Revlon PhotoReady concealer stick, and I've heard this one is just as good or better. I guess I'll have to find out!

5. Garnier Moisture Rescue cleasing cloths for dry and sensitive skin. $8.49. I'm currently using the oil-free Neutrogena cleansing cloths, and I am not a fan at all. Hopefully these will be better! I'll be doing a makeup removing cloth review and comparison soon!

6. Maybelline Line Stiletto liquid eyeliner in Blackest Black. $9.99. I've tried the CoverGirl felt-tip liquid liner, and I was extremely disappointed. This one claims to have really good precision, so hopefully this product will make me like liquid eyeliner. So far, I'm a pencil girl only.

7. Maybelline Instant Age Rewind dark circle eraser in Fair. $11.99. I've heard so many good things about this product! I've been dying to try it for a while now, so I finally bought one, and I just tried it out... I actually quite impressed! It's like a liquid concealer, but it doesn't feel dry or thick, and it actually kind of feels refreshing! The coverage is good for people with some darkness around their eyes, but mine are really bad so I might have to layer it on. I was actually a bit worried when I started twisting the collar and nothing was coming out. It took a while to get the product to the surface, but I still think it's worth it!


If you have tried any of these products, let me know what you thought of them! You can reach me by email at pennilessbeauty@gmail.com or Twitter @PennilessBlog


Have a lovely day!

Thursday, 1 August 2013

My First Z Palette!

Hello again! I'm on vacation at the beach right now, but I figured I should still do a little post about the new Z Palette I bought! This one is the green Cherry Blossom (Limited Edition) in large. I bought it from Makeup Geek who delivered earlier than the estimated delivery date, and even sent a little hand-written message on my receipt! I was really impressed by their service. The Z palette cost me about $40, but that included taxes, international shipping, and an extra bag of round magnets. I still think it's a great price!


I had originally intended to fill this palette with my eyeshadows. I started depotting my shadows, which wasn't too hard (though I accidentally cut myself with a pair of nail scissors, which I had been using to depot). Once I had depotted everything I wanted, I realized that the round magnets were way too big for my shadows. I had seen a tutorial saying you can cut them, but cutting the magnets makes them bend at the cut area, and also makes them very sharp. I ended up really hurting my hands trying to put magnets on my eyeshadow pans.
 
Eventually, I gave up. My hands were hurting a lot, and the pans weren't staying flat on the palette. I ended up having to put all of my depotted shadows into a plastic bucket, and then depotted blushes, bronzers, powders, and some larger eyeshadows (the Annabelle singles are the exact same size as the round magnets). This is what I had the time to do so far, I can post a finished palette once my hands have healed (sigh). Not a great first experience, but it looks awesome when it's done!
 
 
If you know of any products that are already magnetized, or have a better solution to my magnet cutting problem, please let me know! You can tweet me @PennilessBlog or email me at pennilessbeauty@gmail.com


Friday, 26 July 2013

How to Travel With Only a Carry-On

It's finally here! So I've been planning this post for about 2 weeks now... I have tried to pack my carry-on suitcase so that it can hold as much as possible. Tomorrow, I'm going on a week-long trip to my cottage. We spend the majority (if not all) of our time on the beach, so I want to make sure I have everything I need to spend my whole day at the beach.

To start, this is the carry-on I will be using (20" Heys Portal Smart Luggage in Burgundy).
I bought this at Sears for 55% off, so I'm really happy about that! This suitcase has four wheels, a laptop compartment, and a zipper divider.


The main thing I was looking for when I was searching for a new suitcase was a divider that zippered completely shut so I could separate my clothes from other things! When packing a carry-on, it's really important to make a list of everything you need. That way it's harder to forget things or over-pack. I like to put everything I'm packing on my bed so that I can see everything that needs to go in the suitcase. I started off with one pair of jeans, and three pairs of shorts:


I also added a thin, small beach towel (I already have some at my cottage) just in case. Most people say to roll your clothes, which is true for some things, but not bulky items like jeans and towels. So I lay them flat in the bottom of my suitcase to pad the bottom. I like putting thick, tough clothing on the bottom, and more delicate clothing on the top.


As you can see, I put the jeans and towel in flat on the bottom, and laid my shorts on the top. Next, I have two coverups, 7 shirts, 2 tanks, PJs, and a sweater.


I put the sweater on top of the shorts, then rolled everything else a tight as possible. If you have clothing that are cut in an A-line, make sure to fold the ends in to make your clothing more rectangular before rolling. This makes it easier to roll, and the roll won't be as long and skinny!

Next, I folded a dress and a scarf, and laid them on the top. I then secured the straps.


For the pockets of the divider, I folded my underwear and socks, and placed them in the top zippered pouch. My swim suits went in the bottom pouch.


For the small zippered pouch on the side of the suitcase (shown in the bottom of the picture above), I put my goggles so I can swim some laps along the coast for a bit of exercise.


I put my bras in the laptop compartment because I am not bringing my laptop, and it is a very secure pouch. I balled up some tissue and stuck in under the bras so they don't lose their shape.


For my shoes, I put my black sandals, and my hiking boots in a Lulu Lemon Athletics bag. You can use any plastic bag for your shoes, but I really like these types of bags.

For my toiletries, I put my non-liquids in the toiletry kit I got for $5 at my local grocery store.

I'm bringing a hair brush, a tooth brush, a hair clip, some hair elastics and pins, a travel brow comb, some bandages, a razor (some flights won't allow it, but you can always bring the razor handle and buy cartridges when you arrive at your destination), some Dove soap (I'm only taking this; body wash and facial cleanser take up too much room. Dove works well for both!), my Nivea deodorant and sun lip balm, and my Maybelline Baby Lips in Cherry Me (has SPF 20!). I also added some stud earrings in a small Ziploc bag, and put them in as well.


For liquids, I'm taking some Off bug spray (for the evenings), my waterproof CoverGirl exact eyelights mascara, my CoverGirl liquid concealer, Vichy sun lotion, some Bath & Body Works moisturizer, which I put in an old Proactiv bottle, some travel shampoo and conditioner from Herbal Essences, Crest toothpaste, some Proactiv oil-free face moisturizer (which I put in a travel pot), and my CoverGirl BB cream (also in a travel pot).


I was able to fit it all in a plastic Ziploc bag, so I know it is under the maximum amount. Also, all bottles are under 3.4 ounces, so I'll be fine going through security with this.


Back to my suitcase packing, I put the shoe bag and toiletry kit on top of the laptop pouch (no liquids yet!). I zippered up the divider and was able to close the suitcase no problem! There was even a bit more room left, so I was really impressed.

For my 'personal item', I am putting everything in a beach bag. It's much bigger than a purse, and can easily hold things like my sunhat! Even for non-beach trips, I carry my personal items in a tote. I even put my purse inside it! That way if I buy anything, I have lots of room.


There's my navy/white beach bag! I'm putting in my RayBans (with case), my wallet, my fast flats makeup pouch, a Ziploc full of chargers, my Ziploc of liquids, my Kobo e-reader, my phone, my iPod, my iPad, and a sunhat!


My fast flat makeup pouch will hold a pack of gum (ALWAYS), my Maybelline Baby Lips in Peach Kiss, and a compact mirror. Usually I keep the one I bought in Paris in my makeup pouch, but this one is less delicate, so I won't need to worry about breaking it or sand scratching it.


And it all fits perfectly!

Hope you like my packing tricks! They apply to most types of travelling, and I really can put a weeks worth of stuff in a carry-on. Also, for trips that require more makeup, half of my toiletry kit was still empty when I packed it. I'm not worried!

I'll by doing another packing blog post later in August to show you how I pack for a wedding! I'll probably use the same size suitcase, but I'll most likely check it so I can bring more liquids.

If you have any questions, concerns, comments, or requests, feel free to Tweet me @PennilessBlog or email me at pennilessbeauty@gmail.com

Have a nice day!

Wednesday, 24 July 2013

Lawtons Drugs and Shoppers Drug Mart Haul (Canadian Drug Stores)

Hi again, we're having very dreary weather here, so I thought this would be the perfect time for another blog post! Today, I went to Lawtons Drugs and Shoppers Drug Mart to look at some products that I had been doing a bit of research on. I'll start with my Shoppers haul:


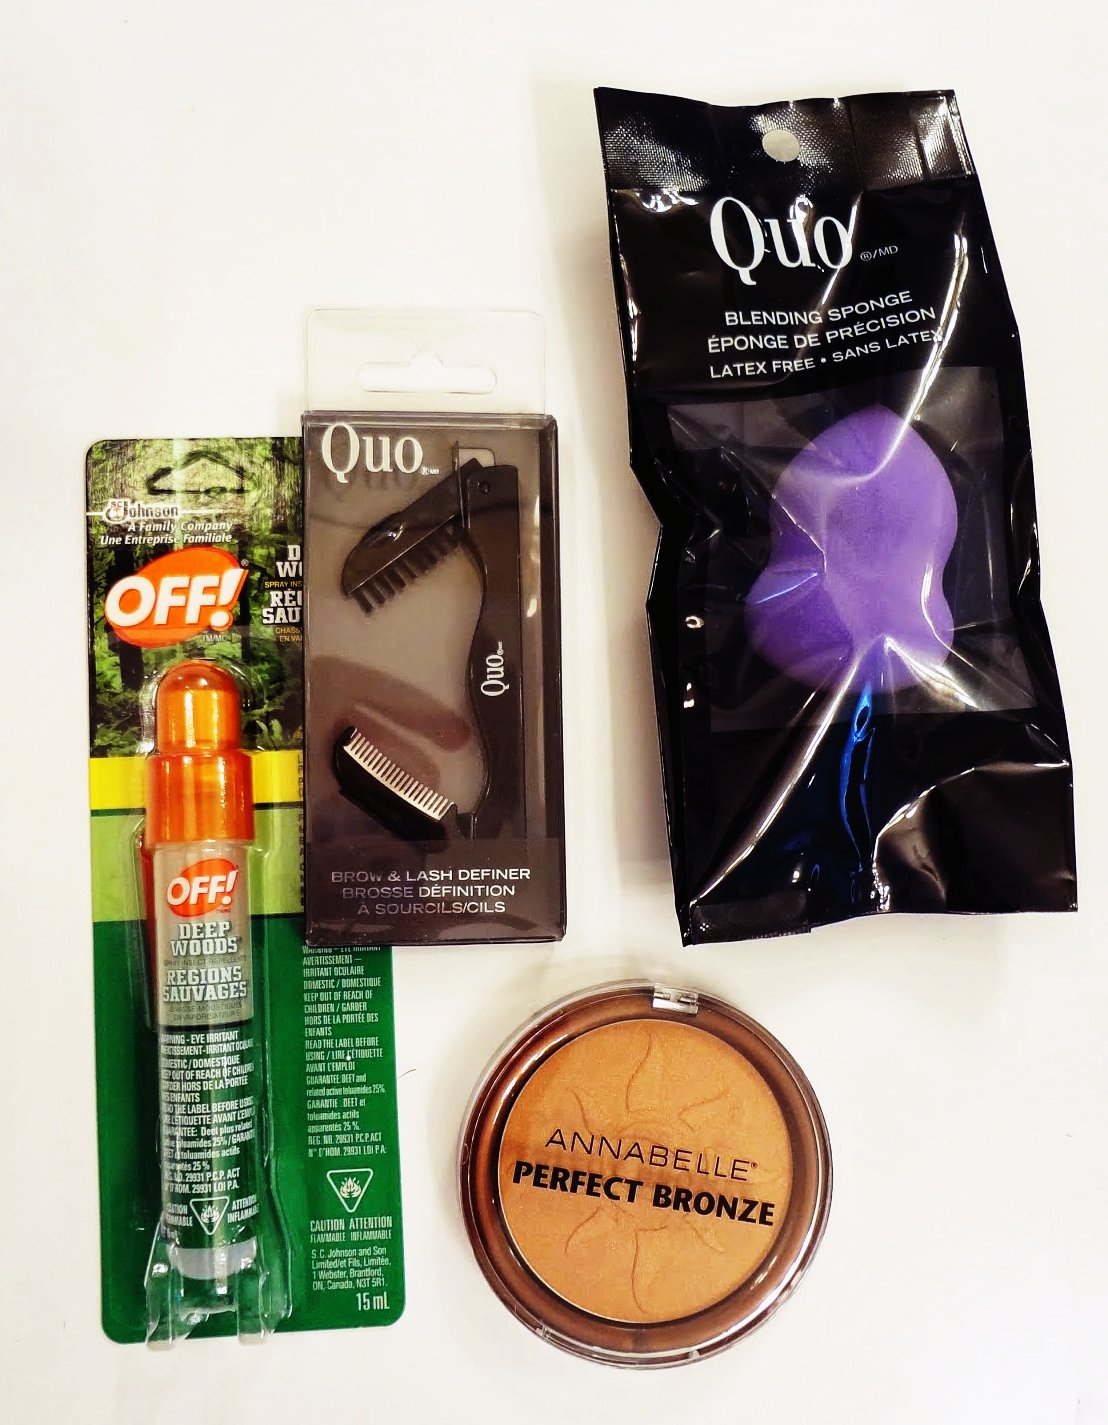
I only bought 4 things, and the total came to $27.10, which isn't too bad considering the quality of Quo products.

1. Quo Blending Sponge $5.00 (Similar to a Beauty Blender, but cheaper!) Quo is a Canadian company that sells makeup products, makeup brushes and tools, nail tools, and nail polish... Basically everything beauty-oriented.

2. Quo Brow and Lash Definer $4.00 (Great for travel, bought it for my upcoming TRAVEL POST!)

3. Off! Deep Woods insect repellent $5.99 (Also great size for travel, and will be featured in my upcoming TRAVEL POST!)

4. Annabelle Perfect Bronze bronzing pressed powder in Sun Kissed $8.99 (Now, I need to say a few things about this brand because it has REALLY impressed me! Annabelle cosmetics is a Canadian brand - based in Montreal - that makes hypoallergenic, paraben-free, and perfume-free products. Whether or not you live in Canada, I would definitely advise checking out this brand in any Canadian drug store or online. This line of cosmetics is absolutely perfect for sensitive skin!)

Now for my Lawtons Drugs haul! I was extremely impressed by some of their sales, especially their Maybelline mascara sale and their Revlon lip product sale. I always get really good deals at Lawtons.


The total for these 4 products came to $20.18, which is amazing considering the lipsticks and mascara should usually be about $10 each.

1. EOS lip balm in Strawberry Sorbet $3.39 (I actually just put some on while I was writing this, and it smells just like strawberry ice cream... YUM)

2. Maybelline Colossal Cat Eyes mascara in Glam Black $4.49 (It claims to leave no clumps, and give you a cat eye look. The brush has the same shape as the CoverGirl Clump Crusher - which I love - so I figured it's worth a try! Especially for the price... WOW!)

3. Revlon Lip Butter in Creamsicle $4.99 (I LOVE the Revlon Lip Butters! This shade looks really bright, I think it will be a nice summer colour)

4. Revlon Super Lustrous Matte lipstick in Nude Attitude $4.99 (I swatched this nude shade, and I find it goes really well with my skin tone. Can't wait to try it out!)


If you have tried any of these products, let me know if you liked them or not! You can tweet me @PennilessBlog or email me at pennilessbeauty@gmail.com ! Once I've tried all of my new products, I'll post a review. I'm definitely thinking of doing a brand review for Annabelle cosmetics... So many blog post ideas!

ALSO, keep checking this blog for my new TRAVELLING CARRY-ON post! It will be up before this Saturday, and I can't wait! Packing and organizing have always been my thing, and I have some really cool tips and tricks to share with you all!

Until next time,
Penniless Blogger

Tuesday, 23 July 2013

Walmart Haul

Hello everyone! So today I decided to browse Walmart for some drawer organizers... Instead, I ended leaving with only makeup products. Anyway, I decided to do a haul to show what I bought for ONLY $33.87! I was actually kind of impressed.


So these are the 6 items I purchased. I have heard great things about all of these products, and I have tried them before. I'll do a review once I've tried them all!

1. Revlon Super Lustrous Lipstick in Silver City Pink $6.97 (Definitely cheaper than drugstores)

2. NYC Smooth Skin Bronzing Face Powder in Sunny $2.97 (Such a good price, really hard to find one that hadn't been opened)

3. Maybelline Define-a-Brow in Dark Brown $7.46 (Hopefully this will be dark enough for my black eyebrows... Why can't my eyebrows be blonde like my hair? Ugh)

4. Maybelline Great Lash Mascara in Clear/Transparent $4.96 (I've heard this works great on brows)

5. Wet n' Wild Coloricon trio in Walking on Eggshells $2.97 (Awesome price, and gorgeous nude shades)

6. Wet n' Wild Coloricon eyeshadow collection in Petal Pusher $4.64 (Another awesome price, and has the most beautiful shades of purple... I think I'm going to enjoy this one!)


If you have tried any of these before, let me know what you thought! Tweet me @PennilessBlog or email me at pennilessbeauty@gmail.com . You can also Facebook me at www.facebook.com/PennilessBeauty

Have a lovely day!

Monday, 22 July 2013

The Many Uses of Tea Tree Oil

Tea Tree Oil is a natural disinfectant that can be used not only for cleaning, but also for skincare and health remedies! The bottle I own is from Holista, and it is 100% Pure (very important) Tea Tree Oil. Like it says on the bottle, it's considered a herbal antiseptic.


1. Treats acne
This is the main reason why I started keeping a few bottles of Tea Tree Oil in my house. Because it is a natural disinfectant, it will clean out your pores and make acne disappear. I find the best way to use it is to put a drop on a cotton swab, and press it directly on any pimples you may have. Another option is to add 20 or so drops to you bottle of face wash, though I would only recommend that if your face wash is a mostly natural product. You don't want to risk adding Tea Tree Oil to something that won't react well with it. It could cause irritation and redness.

2. Insect repellent
Add 15 to 20 drops of oil to 1L of water, and place in a spray bottle. Very effective, and this way you're not putting chemicals all over your skin!

3. Antiseptic for cuts, blisters, and burns
We all know that blisters on your heels hurt like crazy and prevent you from wearing your favourite (though uncomfortable) shoes. With Tea Tree Oil, just clean the blister, burn or cut. Then, apply 2 to 3 drops of Tea Tree Oil on the wound, and let it sit for a few minutes before putting on a bandage. This keeps the wound from getting infected, and also speeds up healing!

4. Helps relieve cold and flu symptoms
There are multiple ways of using Tea Tree Oil for relief of cold and flu symptoms. The first, add 2 to 3 drops into a pot of boiling water. Remove the pot from the stove, and breath in the steam once it has started cooling down. This is also good for any kind of chest congestion or asthma. The second, add 10 or so drops with some Epsom salt in a warm bath. This also helps with muscle pains, and any chest congestion. You can also dilute it with another oil (like grapeseed or olive oil, 1 drops per tbsp. of cooking oil), and apply directly on your chest. It acts like VapoRub.

5. Anti-fungal treatment (for Athlete's Foot and Eczema)
For Athlete's Foot, clean your feet, then apply Tea Tree Oil directly on any affected areas. You can dust corn starch on it after to wick any moisture. Do not do this more than twice a month, since Tea Tree Oil is very strong, and should not be used in large quantities.

6. Help with dandruff, dry scalp and head lice
Add 20 to 30 drops of Tea Tree Oil to your daily shampoo. You can also add a drop or 2 to your lip balm to help with dry, chapped lips.


Hope you find this helpful! It's definitely a cheaper, more natural solution to most of these problems. Plus, there are dozens more uses for this natural antiseptic! These are just the ones that I've heard good things about.

P.S. I'll have a post on travelling carry-on up later this week! You can follow me on Twitter @PennilessBlog

Bloglovin

<a href="http://www.bloglovin.com/blog/9963881/?claim=kagwqhtkpp6">Follow my blog with Bloglovin</a>